The pattern for the candy corn amigurumi is on the Lion Brand website here. I used KnitPick's Cotlin and a size E crochet hook. The sweet potato bread with ginger coconut milk ice cream is here.
When I shared my "Shiver Me Timbers" filet crochet piece, I promised I would tell you how I work filet crochet from cross-stitch charts - today's the day! And if you haven't done any filet crochet before, I highly recommend you do an easy, quick project first such as the bookmark I give instructions for here.
First you need to find an interesting design/pattern that doesn't rely on more than color to let the pattern be seen. So if you find a wonderful Christmas tree cross-stitch pattern with lots of ornaments on the tree, garland, etc. .... that won't work. There would not be a way to visually separate the decorations from the tree. Cross-stitch done in one color of thread will almost always work - but don't discount multi-colored designs just because they are multi-colored. They'll still work as long as you can imagine it being done in one color of thread and still be able to see the pattern. One way to check is to copy the image of the pattern, put it into a word processing document, and print it out in black and white. If the pattern still looks good, it'll work! I'm beginning on a new table doily, so I'll walk you through how I started it out.
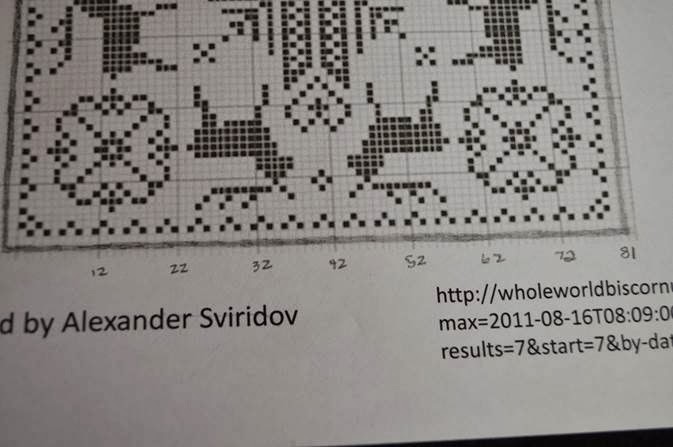
First I found my pattern. There's this wonderful blog where people around the world sent in images and charts for biscornu they made. Uh huh - what the heck is a biscornu, you ask? I asked the same thing and learned something new! They are cross-stitched pin cushions that are made in a certain way - usually with a button in the middle. If you're intrigued by these and want to learn more, Mary Corbet talks about them here. The pattern I like was for a Norwegian themed biscornu designed by Alexander Sviridov. You can see it here.
After I found the pattern, I copied the image for the chart and pasted it into a PowerPoint document I use as an idea book. I enlarged it so I could see the individual squares and then printed it out.
Working on the printout, I then colored in the first row I wanted in my doily. I always like to have a row of solid squares running around the piece acting as a sort of frame. Next I counted how many squares I'd be working with - in this pattern it is 81.
To find out the number of chains I needed to make for my foundation I counted 3 each for the first and last squares. That's 6 so far. Then I multiplied the remaining squares times 2 ... 79 x 2 = 158. Added to the previous 6 that makes 164. Now I add 2 more for the beginning chain (for when you do your first double crochet in the 4th chain from the hook). And came up with a total of 166. I made a 166 chain foundation chain. The first row has all solid squares, so I double crocheted in the 4th chain from the hook and in each chain across for a total of 164 stitches.
The second row has all empty squares except for the first and last ones. I chained three and turned (counted as my first double crochet) and double crocheted in the next two stitches. Then all the way across I did chain 1, skip one, double crochet. When I reached the last square, I filled it in by double crocheting in each of the last two stitches.
Now I'm just continuing to add rows by following the pattern on the chart. For each solid square I fill it in with double crochet and for each empty square I leave it empty by chaining one and skipping the next stitch. I find it helps me keep track of where I am if I put a small check mark next to each row that I complete. And remember to chain three at the start of each row!
I'll show you what the finished piece looks like when I'm done - this often takes me a long time to finish large filet pieces, though, as I get tired of working on them and start other projects so it will most likely not be soon!
A few weeks ago I posted a link to a color challenge hue test and told you all I'd tell you what I scored the following week .... oops. I was traveling at the time and by the time we arrived back home, I totally forgot! Anyway, I scored a 4 - and thought it was very interesting that the four I missed were all in one area. Which seems to suggest that this is an area of color I'm less able to discern differences in! Hmmm ... and it's even one of my favorite color areas!
One of the best classes I had while studying for my BFA was the class in color theory. I still use it frequently in designing my work .... however, it was quite awhile ago and I've become lazy in which parts of what I learned I still use. And the parts I don't use got pretty much forgotten! So while looking around, I came across this fantastic color theory tutorial on Janet L. Ford Shallbetter's website. She has great explanations and examples and it reactivated all that long ago knowledge I once had. If you want to learn new ways to pump up the effects color has in your work (whatever the medium is), I highly recommend spending time with this!
And after you work your way through the different sections, Janet has links to some color planning tools that I'm already making good use of. The first is Janet's Palette Picker. It gives a nice way to see how different colors you're thinking of using look together - and by manipulating the numbers on your first color, can work for planning monochromatic schemes.
And I love Eric Meyer's Color Blender! You take two colors, input how many colors you want to get from the first to the second, and voila - it generates them for you! I've had way too much fun playing with this ....
The Color Scheme Designer gives you color possibilities to use in different color schemes. You pick the color scheme you want, rotate the black dot on the color wheel to the color you want, and the color scheme is displayed on the right. I had it figure out colors for a complementary scheme for me!
Well, I'm off to continue working out an embroidery idea using the Color Blender!
With Halloween coming up next week, here's a quick banner to add to your decorations!
Materials: *orange, white, gray, and black felt *small amount of Halloween print fabric *Steam-a-Seam II *Photo Fabric *7/8 inch ribbon *Vintage Halloween postcard images here - be sure to print in landscape
1. Take an 8 1/2 by 11 piece of paper and fold in half lengthwise. Draw a line from the bottom corner on the folded side to the corner diagonal to it. Cut out for your banner pattern. Using this, cut 2 gray triangles and 3 black triangles.
2. Peel the back off one piece of Steam-a-Seam II and press onto the back of the piece of Halloween fabric. Turn over and cut out two circles - anywhere that interests you.
3. Apply Steam-a-Seam II to back of the circles and iron to attach to the black felt. If you're using a poly felt such as Eco Felt, use a pressing cloth or piece of paper between the iron and the felt - the temperature of the iron will melt the felt, otherwise! Cut out the circles leaving about a 1/4 inch frame. Peel the back off a sheet of Steam-a-Seam II and press the circles onto it. Cut out and iron onto the gray triangles.
4. Print the vintage Halloween postcard images onto a piece of cotton Photo Fabric. If this is your first time using this, see this past post.
5. Press a sheet of Steam-a-Seam II to the back of the printed fabric and cut the postcards out. Iron onto the black triangles.
6. Pin gray triangles to white felt and black triangles to orange felt and cut out, leaving about a 1/4 inch frame. Sew in place about 1/4 inch in from the edges using a longer top stitch.
7. Cut a piece of ribbon to fit where you want your banner to go plus 12 inches if you're using tacks to hold it in place or 2 feet if you're tying the ends to something. Fold in half and put a pin in to mark the place.
8. Find the center of one of the black triangles and pin to the ribbon at it's mid-point. Pin the rest of the edge in place.
9. Next pin a gray triangle to the ribbon, placing its upper point one inch from the upper point of the black triangle.
10. Sew triangles to the ribbon over the stitching that's already there.
I like the way this turned out so much, I just may start on a Thanksgiving banner!
If you've been wanting to try filet crochet but haven't known where to start, this simple Halloween bookmark is a good first project. Generally I use size 20 thread and a size 12 or 13 hook when making filet crochet - it gives a tighter stitch and makes it easier to see the pattern. However, because the stitches are much smaller, it takes a lot longer to finish a piece. The size 10 used in this bookmark gives you a chance to practice the stitches and learn how to read a chart without committing to months long project!
Materials: *size 10 black crochet thread *size 8 crochet hook
In filet crochet, a chart tells you where to make a double crochet stitch and where to make a chain. It's these two basic stitches that you'll be using and that make the pattern. I've written out the instructions for each row, but once you get the hang of what to do with a filled square and what to do with an empty square you can stop reading the written instructions and just go from the chart.
Start by making 21 chains.
Now you'll be working from the bottom of the chart up. Every place you see a filled in square you are going to fill it in with a dc. Every place you see an empty square you are going to leave it open by making a chain stitch.
Row 1: Every square in row 1 is filled in so you will want to have a stitch in every chain you made. Make a double crochet stitch (dc) in the fourth chain from the hook and in each chain to the end. You should have 19 stitches.
Row 2: The first square is filled in. Chain 3 (counts as your first dc), dc into the next two stitches. This completes the first square. The next square is empty. Chain 1, skip the next stitch, and dc into the following stitch. This completes the second square. The following 6 squares are empty - for each square, chain 1, skip the next stitch, and dc into the following stitch. The The eighth square is filled in. Dc into the next two stitches. Row 1 is finished! Chain 3 and turn.
Row 3: The first square is filled in, so dc in the first two stitches. The next square is open, so chain 1, skip the next stitch, and dc in the following stitch. Square 3 is empty, so chain 1, skip the next stitch, and dc in the following stitch. Squares 4, 5, and 6 are filled in, so dc in the next 6 stitches. Squares 7 is empty, so chain 2, skip the next stitch, and dc in the following stitch. Square 8 is empty, so chain 2, skip the next stitch, and dc the following stitch. Square 9 is filled in, so dc in the last two stitches. Chain 3 and turn.
Row 4: The first square is filled in, so dc in the first two stitches. Square 3 is empty, so chain ,1 skip the next stitch, and dc in the following stitch. Squares 4 is filled, in so dc in the next two stitches. Square 5 is empty, so chain 1, skip the next stitch, and dc in the following stitch. Square 6 is filled, so dc in the next two stitches. Squares 7 and 8 are empty, so chain 1, skip the next stitch, dc in the following stitch, chain 1, skip the next stitch, and dc in the following stitch. Chain 9 is filled in, so dc in the last two stitches. Chain 3 and turn.
Rows 5 - 8: Same as Row 4.
Row 9: Same as Row 3.
Row 10: Same as Row 2.
Row 11: Same as Row 3.
Rows 12 - 16: Same as Row 4.
Row 17: Same as Row 3.
Row 18: Same as Row 2.
Row 19: Same as Row 3.
Row 20: Same as Row 4.
Rows 21: Same as Row 3.
Row 22: The first square is filled in, so dc in the first two stitches. Squares 2 - 4 are empty, so chain 1, skip the next stitch, and dc in the following stitch for each of the squares. Squares 5 and 6 are filled in, so dc in the next 4 stitches. Squares 7 and 8 are empty, so chain 1, skip the next stitch, and dc in the following stitch for each of the squares. Square 9 is filled in, so dc in the last two stitches.
Row 23: Same as Row 3.
Row 24: Same as Row 4.
Row 25: Same as Row 3.
Row 26: Same as Row 2.
Row 27: Every square is filled in, so dc in every stitch across the row. Finish off.
Weave in the thread ends, iron flat, and you're done!
Here are some fun autumn themed crochet pieces I've come across in my searches!
This fun Thanksgiving doily is from crochetdoilies.com. You can buy the pattern here. If the stores around you are like the ones in my area, it's getting harder and harder to find crochet thread in a variety of colors. I've been ordering mine from here and here.
I love Cathy Shaughnessy's free form autumn piece! This looks like a great way to use some of those leftover yarns I've been saving forever, too .... She has some other beautiful pieces here.
Alicia Kachmar has free instructions on her website for these creative bunches of Indian corn, using Lion Brand Homespun. I have some bits of that, too!
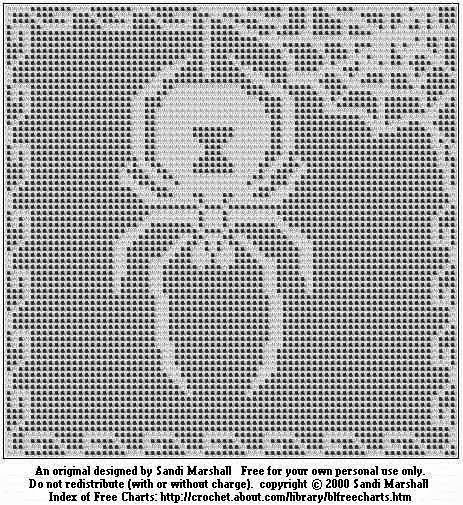
And if you hurry, you'll have time to make this spider filet doily for Halloween! Originally designed by Sandi Marshall, the instructions are free on about.com crochet. This would look great done in a black thread, too.
A little show and tell from my recent trip to New England!
I can't wait to start spinning this delicious Vermont blue faced leicester roving - dyed a gorgeous blue. I have no idea what I'll make with it yet ...
And this beautiful alpaca/merino handspun wool from Rumination Farm will become a winter knit scarf for my husband ...
Now if I can only get caught up on everything so I can start new projects!
One of the cool things about filet crochet is that besides filet charts, you can also use cross stitch charts - this opens up a lot of interesting designs. I've been working on Shiver Me Timbers off and on over the past year and finally finished it! The design is from a cross stitch chart on the Kincavel Krosses website.
For a border, I crocheted a solid row, did a row of mesh, and then added a final solid row, adding extra stitches on each corner every row to keep the piece laying flat.
I'm still working on the filet crochet tutorial but should have it up soon. Edit: It's up now here!
I've been working on a filet crochet project (I'll show you on Monday) and realized that you hardly hear anything about that form of crochet these days. Basically it's making squares in a grid with double crochet stitches and then filling in some of those squares to form pictures. The technique has been practiced since at least the 1500's as one way to make lace. It was popular into 20th century and often used to make tablecloths, table and dresser scarves, antimacassars for chairs and sofas, and doilies.
Caroline Ventura has some wonderful photographs of Portuguese altar cloths on her website that are definitely worth a look.
If you think this is something you'd like to try, stay tuned! I'm working on a beginner's tutorial. (Edit: It's up now here!) If you want to give it a go before then, Crochet Pattern Central has a nice list of free pattern here and it's not very hard to figure out on your own.