Friday, October 29, 2010

Friday Inspiration - Happy Halloween!!


It's that time of year again when thoughts turn to skeletons, zombies, and scary things in the night.  This is currently a popular subject year round for fiber artists!

Katherine Knauer is a quilt artist who has done several skeleton themed works.  My favorite is Funeral.

Katherine Knauer, Funeral, 1985.  Quilt, 30" x 48".
Her website inspires me to sketch my ideas for art quilts (so far I'm big on sketchy, not so big on actually making them) - I hope it inspires you!

This amazing skeleton was knitted by fiber artist Ben Cuevas.  Be sure to check out his website and look at the detail shots!

Transcending the Material


You'll also see various body parts he's knitted for an exhibit, such as the brain to the right.  And depending on how comfortable you are about bodies, you might want to look at the site first if you're planning on looking at it with your kids!


Now we get a little more macabre ....

Shannell Papp knitted this skeleton who still has all his insides - kind of - for the 2009 Toronto City of Craft Art Festival.  The website has two more views of the piece.  As someone who is pretty bad at knitting, I am in awe of works like these!

Lab #4
Ah, zombies ....  We love them!  Adam Parker Smith created these zombie mask works for his Bold as Love exhibit two years ago in New York.  I would have liked to see that!


So have fun with all the monsters that will be creeping around - and if you get inspired by one, grab your sketch book.  You never know what type of fiber art might come of it!

Wednesday, October 27, 2010

Wednesday Sewing - Bug Quilt/Quilting Basics Part II


Recap:  When we last saw our busy quilters, they were madly measuring and appliqueing fabric jars of bugs onto a quilt top!

After you complete your quilt top (see last Wednesday's posting here), you're ready to put your quilt together.  For this you need:
- a quilt top - this is the piece of fabric you just appliqued the bug jars onto
- batting - this is the fluffy stuff that goes in the middle of quilts.  You can get regular batting that you pin in place and iron on batting that has an adhesive on each side that sticks to your quilt top and backing when ironed.  This sounds better than really is - whichever type of batting I use, I always think the other one would've been a better choice!  The iron on doesn't actually stay in place, so you have to keep readjusting it anyways.  It's really good for small quilted projects, but I wouldn't want to attempt anything larger than a lap or baby quilt with it.
- quilt backing fabric - your choice here, but if you made a cotton fabric front, I'd stick with a cotton fabric back.  I chose stars.
- quilting machine needles - these are sharper and work much, much better than regular sewing machine needles when you're going through all those layers.
- machine thread - I just use my usual thread, but there is quilting thread - it's thicker.
- binding - this covers the edges of your quilt after you've quilted it.  You can make binding (see this past post) or buy it.  I'm using purchased satin blanket binding.
- large safety pins - to baste if you're using non-iron on batting and to baste after you have to loosen your iron on batting
- quilting foot for your machine - this foot helps all the quilting layers move under the needle at the same rate so you don't end up with puckers.  It grips the top layer as the feed dogs move the bottom layer along.  The Brother 6000i I use comes with one that also has a stitch guide to help you sew straight quilting lines.  If your machine didn't come with one, you can probably buy one at a sewing center.  It's also possible, just a little harder, to quilt with a regular foot.  You'll just have to work harder to keep puckers from forming.

1. Find a large flat spot to lay out your pieces.  Lay the backing on the bottom and the batting on top.  At this point, I like to pin the backing to the batting. . .


and then lay the quilt top on top.


2.  If you are using iron on batting, follow the instructions for ironing/fusing it.  If you are using regular batting, place safety pins about every six inches apart to hold it together.


3.  With the Brother machine, you need to take off the regular shank to put your quilting walking foot on.  Use the screwdriver that came with your accessories and take off the screw that holds the regular shank on.


4.  Put the quilting foot on.  I like to have the line guide on the left since it's hard to bunch the quilt up against the machine and still use the quilting foot.


5.  Draw a line with chalk or some other removable marking tool down the center of your quilt.


6.  Sew a straight line along the line you just marked.  Because you're sewing through a lot more layers than usual, it's a good idea to sew on a test piece to make sure your tension is okay.


7.  Line your guide up on the line you just quilted.  Quilt your next line.


8. Continue in this way until you have quilted the first half.  Turn your quilt the other way and use the line guide to quilt the other half.  You'll need to keep readjusting the pins to keep from getting puckers.  If you're using iron on batting you'll most likely need to reposition it a couple of times. 

Guiding the quilt can be tough - some people use quilting gloves to help hold the fabric.  You can buy them, or you can buy a cheap pair of gloves at the dollar store and use puffy paint to put "grabbing" lines along them.


9.  When the entire quilt is finished, trim the edges. 


10.  Next, attach the binding.  Binding has one side that's shorter than the other.  You'll want to pin the shorter side on the top of the quilt - this helps you make sure you're catching the bottom layer of binding in the sewing.  First, pin binding along one side and sew it in place.  Don't cut the extra off.


11.  To make a mitered corner, fold the corner as shown below. 


12.  Make sure the back of the corner looks as nice as the front, pin, and sew along the next quilt edge.


13.  When you get to the end of the binding or the end of the quilt, turn end under about 1/4 inch.


14.  Fold as shown below.


15.  Put mitered edge over the already sewn edge and pin.  Sew binding on and then hand sew the diagonal seam in a hem stitch.  Depending on the length of your binding, you'll probably have to do this twice.


Iron and enjoy!


Happy Creating! Deborah

Monday, October 25, 2010

Monday Project - Squirrel Embroidery Pattern

One of the Nana things I like to do for little c is dye and embroider jersey knit dresses - her mom puts little leggings under them and she looks so cute!  I've had a sage colored dress that I was trying to decide what fall type embroidery it needed.  Then I watched squirrels in New Hampshire a couple of weeks ago busily gathering their last acorns before winter and a squirrel it was!

One of the best places I've found to buy white, ready to dye clothing is Dharma Trading Company.  They have a ton of different styles and are really, truly helpful if you call them with questions.  The dress I worked on is a new one they carry - a lapped top dress.  This is a 6 month size and little c wears 12 months.  It fits, so I'm thinking these run a little large.


Materials List:
*embroidery floss and needle - if I'm sewing on jersey, I use regular embroidery floss.  On thicker materials, like a sweater, I use perle cotton (it's right near the embroidery thread in a smaller section since it doesn't come in as many colors)
*pattern - get here
*disappearing fabric ink pen - usually found in quilting sections or stores

See this past post here if you would like to dye the fabric you're working on.  See this past blog for tutorials on outline, lazy daisy, and french knot stitches.

1.  Print the pattern and cut it apart into pieces as shown below.


2.  Using a disappearing ink fabric pen, trace around the main squirrel body, head, and tail.


3.  With three strands of embroidery floss, use an outline stitch along all the lines you traced.


4.  Use small straight stitches to make v's all the way around the tail.


5.  Draw the facial features on.


6.  Use small straight stitches to fill in the eyes and nose and outline stitches to embroider the rest.  Trace around the acorn.  Fill in the acorn details.  Draw in the grass and the center for each flower.


7.  Use outline stitch to embroider the edges of the acorn, large X's in the acorn cap, and small x's on the acorn body.  Use outline and short stitches for the grass.  To embroider flowers, use the center to work lazy daisy stitches around and then add a french knot in the center of each.


Happy Creating!  Deborah

Friday, October 22, 2010

Friday Inspiration - A Space In Between


If you're not a subscriber to Fiber Arts Magazine, I highly suggest getting hold of the Nov/Dec issue.  There's inspiration galore and most inspiring to me is the article on Margarita Cabrera's A Space In Between exhibit that was in Houston's Box 13 Gallery earlier this year.


 Margarita is most known for her soft sculptures and the way she looks at the political scene of immigration from Mexico into the border states.  In a previous project, she created sculptures of consumer goods made in over the border factories.  She used the actual parts if they were made in this country and replaced the parts made in Mexico with sewn vinyl.  There are several ways one can look at these pieces - they make me think of the people who put these good together for consumers in other countries.  Can they even afford their creations at the wages they're paid?

Margarita Cabrera, Sewing Machine


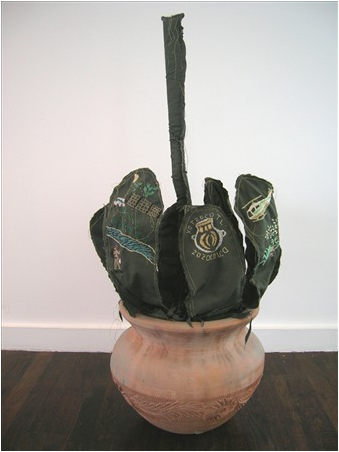
In A Space In Between, Margarita shows us individual stories of nine people who crossed the border from Mexico seeking work in the US.  If you live in the Southwest, every night's news carries stories about the immigration/border situation - but these are pretty much just general stories about "them."  For this exhibit, Margarita hired the nine to assist her in building the sculptural pieces.  She took discarded Border Patrol uniforms, cut into parts for desert plant soft sculptures, and had her assistants embroider scenes from their own border crossings.  It's very moving.  There are images of heat, desert, snakes, helicopters, hiding ... 


Maria Lopez, Saguaro

Miguel DeLuna, Agave

Be sure to check out Margarita's website for more of her work and Box 13 for a write up of the show.

Wednesday, October 20, 2010

Wednesday Sewing - Bug Jar Quilt/ Quilting Basics - Part I


Bug jar quilts were very popular several years ago (maybe quite awhile ago!) and I always wanted to make one but didn't have any little ones to sew for, so I never did.  These are quilts with jar shapes cut out from bug themed material and appliqued onto the quilt top - like the jars of bugs I collected when I was growing up.  The arrival of a new great-nephew inspired me to finally do it!  Actually, I made two since he joins a 3-year-old big brother.

Over the next two weeks I'll show you how I made the quilts.  Even if you don't want to make a bug jar quilt, I'll be showing you simple quilting techniques you can use on any beginning level type of quilting.  This week we'll work on making the quilt top and next week we'll put it all together.

The quilt turns out about 48" x 40", depending on how much you have to trim off after quilting
 

Materials List: 
*At least 9 different types of bug (or creepy crawly) cotton material.  I made my quilt top with 9 jars, but you could add another jar per row for 12 jars if you wanted.  A fat quarter of each is good or if you "collect" (ahem ... hoard) material like me, go ahead and get a 1/2 yard!
Some good places on the internet to look are Bug Fabric, eQuilter, and Spoonflower.
*grayish fabric for the jar tops (about 1/2 yard)
*1 1/2 yards top material - something that looks good with bug jars
*1 1/2 yards backing material - I decided on stars
*crib sized quilting batting (I decided to try the fusible kind on these quilts - the quilt turns out a bit stiffer even after washing.  It's a toss up as to which is easier to use - regular batting requires a lot of pinning and re-pinning, fusible bunches up and requires re-ironing.)
*5 yards binding - I used Satin Blanket Binding
*a lot of large safety pins if you use regular batting
*Steam-A-Seam 2
*quilting needles
*thread to match or coordinate with your top fabric
*machine quilting foot with line guide
*bug jar and lid pattern

1.  Wash and dry all your fabric.  I find it easier to make appliques if it's ironed smooth.

2.  There are lots of different patterns for the jar shape on the internet, but they all have straight sides with points where the jar tapers up.  I wanted one that looked like a real Mason jar, so I developed this one you are free to use for your quilts.  Please don't sell the pattern and if you re-post it, link back to this post.  Thanks!

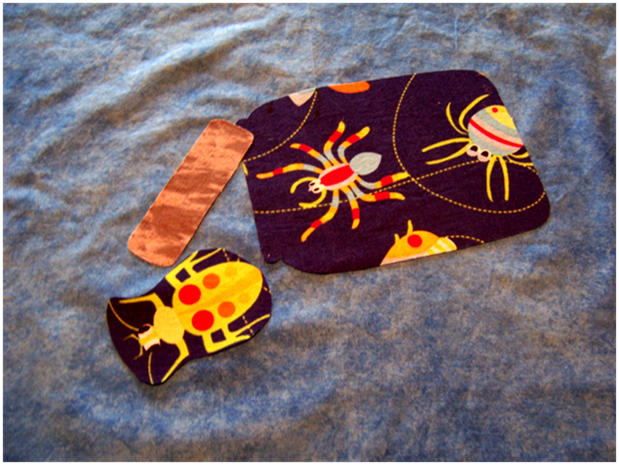
Cut nine jars from bug fabric and nine lids.  I also cut a bug out of one of the fabrics to make an open jar on the bottom:


3.  Attach one side of the Steam-A-Seam 2 to the back of the jars and lids.  This leaves the sticky back side showing - it's helpful to have this side sticky when you are placing the pieces.  If you haven't made appliques this way before, take a look at this past post for more details.

4.  Place your jars and lids on the quilt top.  My rows are 7 inches apart and the jars in each row are 5 1/2 inches apart.  How far in from the edges will depend on the width of your quilt top material.


5.  When you have the jars and lids placed where you want them to be, iron into place.


6.  Zigzag stitch around each jar/lid.  I used a .2 length and 3.5 width (make a test on scrap first).  I started at the bottom of one lid, went all the way around the outside of the jar and lid until I got back to where I started and then sewed across the bottom of the lid.


Your quilt top is finished!  Next week we'll put everything together and quilt and bind it.

Happy Creating!  Deborah

Monday, October 18, 2010

Monday Project - Excuse me, that's my luggage!


When we bought our luggage 11 or 12 years ago it was wonderful!  No one else had red luggage, so we could easily spot it on the baggage carousels and no one tried to take it thinking it was theirs.  Over the years, more and more red luggage has appeared on the carousels.  I've been traveling a lot lately and retrieving my luggage has become hard again.  Over half the suitcases are red and not everyone looks at the tags (or at my orange handle cover and tape measure ribbon tied on), so I have to run up as my luggage is leaving the conveyor belt in the hands of someone else!  "Excuse me, that's my luggage!"  It always receives the reply of, "I don't think so."  It is.

Instead of spending hundreds of dollars on new luggage (I've seen purple showing up, though, so it has been tempting) I decided to add some art to my suitcases in a way NO ONE could miss.  I bought canvas Photo Fabric, found pictures of vintage travel stickers through Google images, and stuck them on with Liquid Nails.  I like it!  Below are the details if you'd like to do this, also.  If you haven't used Photo Fabric before, take a look at this past blog post first.


Materials List:
*suitcase
*Photo Fabric Canvas printed with vintage travel stickers/posters
*Liquid Nails
*Mod Podge for fabric
*vinyl gloves
*disposable knife or spreader
*paint brush


1.  Finish the edges of the printed stickers - I used a zigzag to go around the outside, set at .2 and 3.5.


2.  Cut stickers out, trimming close to edge of stitching.


3.  Apply Liquid Nails in a thin layer to the back of a sticker, getting to the edges.  I put on vinyl gloves and use a disposable plastic knife.  This stuff does NOT come off without a special solvent, so be careful where you get it!


4.  Press onto luggage, starting at the center of the sticker and working outward.

5.  Let the glue set for an hour or so and then apply a coat of Fabric Mod Podge.  Don't worry - it'll look really milky opaque, but it dries clear and seals the fabric so that if it gets mud or something on it you can wipe it off.  Mod Podge washes out of brushes with soap and water if you get it washed out right away.


One down, three to go!  I better get moving since I'll be off to see my son, daughter-in-law, and little c before too long.


Happy Creating!  Deborah